Salesforce
Salesforce is the world's #1 CRM platform, offering a comprehensive suite of cloud-based applications for sales, service, marketing, and more.
Install Translate.website on Salesforce
Running your website on Salesforce Experience Cloud or Salesforce CMS? You don't need Apex development, managed packages, or code deployments to make your Salesforce site multilingual.
Using Salesforce Experience Builder's built-in Head Markup setting, you can safely inject the Translate.website script into your Salesforce Experience Cloud site in just a few clicks — no backend modification, no infrastructure changes, no developer required.
Once set up, Translate.website will automatically detect and translate your Salesforce site content in real time for visitors in different languages.
This guide walks you through the entire setup from start to finish.


Configure Experience Builder to Enable Translate.website
Salesforce Experience Builder's Head Markup setting allows you to inject custom JavaScript across your Experience Cloud site without any Apex code, managed packages, or deployments. Here's exactly how to set it up.
Login to Salesforce Admin
- Open your browser and visit https://login.salesforce.com.
- Enter your Salesforce admin credentials (username and password) and click Log In.
- Once logged in, you'll be taken to the Salesforce Setup home. Click the gear icon (⚙️) in the top-right corner and select Setup.
- Make sure your account has System Administrator permissions — you'll need full access to manage Experience Cloud sites.
Navigate to Digital Experiences (Experience Cloud)
In Salesforce Setup, use the Quick Find search box at the top left of the sidebar. Type Digital Experiences and press Enter. Click Digital Experiences → All Sites to see a list of your Experience Cloud sites. Find the website you want to translate and click Builder next to it.
- In Setup, type Digital Experiences in the Quick Find box.
- Click Digital Experiences → All Sites.
- Find the site you want to translate in the list.
- Click Builder next to that site to open Experience Builder.

Open Experience Builder Settings
In Experience Builder, look for the Settings panel. Click the Settings icon (gear icon) in the left sidebar or the top navigation. Navigate to Advanced settings. Locate the Head Markup section — this is where you can inject custom HTML and JavaScript into the <head> of every page.
- In Experience Builder, click the Settings icon (gear ⚙️) in the left panel.
- Click Advanced in the Settings menu.
- Scroll down to find the Head Markup field.

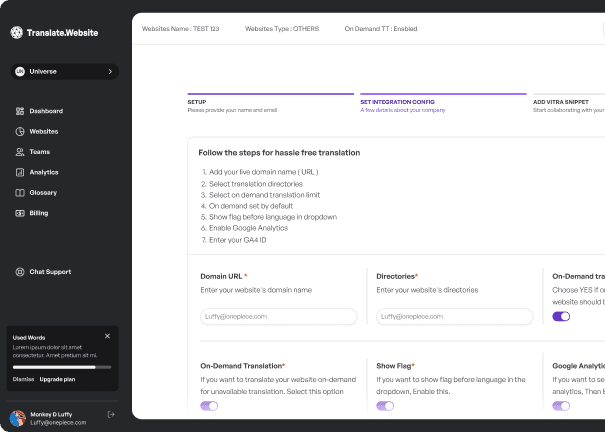
Add Translate.website Script and Publish
In the Head Markup field, paste your Translate.website snippet. Your snippet is available in your Translate.website dashboard after signing up. After pasting the script, click Save. Then click Publish in the top right corner to make the changes live on your Salesforce Experience Cloud site.
- Paste your Translate.website snippet into the Head Markup field.
- Your snippet is available in your Translate.website dashboard.
- Click Save.
- Click Publish in the top right corner to push the changes live.

🚀 What Happens After Installation?
Once you publish, the Translate.website script will be served to every visitor on your Salesforce Experience Cloud site. The script automatically detects the visitor's language and presents a translation widget — covering all your Experience Cloud content in real time.
🌐 Your Salesforce Website Becomes Multilingual
Translate.website covers all content types across your Salesforce site:
- Experience Cloud portals — partner portals, customer portals
- Knowledge bases — support articles, help center content
- CMS content — pages, banners, news articles
- Landing pages — campaign pages, product pages
- Customer dashboards — account views, case management
- Community pages — forums, discussions, announcements
🔎 SEO-Optimized Language Versions
Translate.website automatically serves translated content that search engines can index, helping your Salesforce site rank in international markets without any additional SEO work or hreflang configuration.
⚡ No Performance Impact
The Translate.website script loads asynchronously and has zero impact on your Salesforce site's loading speed. Your Experience Cloud performance scores remain unaffected.
Why Not Use Salesforce Native Translation?
Salesforce's built-in translation tools are complex and limited:
- Requires language activation in Translation Workbench — needs Salesforce admin setup
- Needs Translation Workbench — only available on certain Salesforce editions
- Involves manual label translation — requires translators to work inside Salesforce
- Requires developer support — custom components and labels must be translated in code
- Complicates deployment — translation packages add complexity to release management
🔁 Safe & Reversible
This integration is completely reversible. To remove Translate.website, simply go back to Experience Builder → Settings → Advanced → Head Markup, delete the script snippet, and click Save → Publish. No Apex code was written, no packages were installed, and no permanent changes were made to your Salesforce org.
Ready to go multilingual with Salesforce?
It takes less than 5 minutes. No Apex, no packages, no developers — just your Salesforce admin credentials and your Translate.website snippet.